Stackable 1-Drawer CD/DVD Cabinet
Easy Assembly Instructions
Stock No. DB5200
- This assembly only takes a few minutes, and requires no tools. Pieces simply snap together!
- Open box and remove plastic pieces from plastic padding materials, laying them out in a well lighted room, on a large flat surface such as a table, work bench or desk.
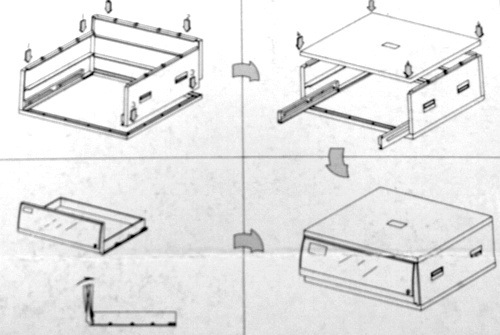
- Identify the two large flat rectangular pieces, one for the top and another like it for the bottom. Then identify the two side pieces with the sliding rails already assembled onto them. Note the back piece that does not have the rails. Next identify the large sliding drawer, and its matching snap-on front piece with the black shiny outside cover. Identify the single thin piece that will serve as a center divider for the drawer (about 1.5" by 9"). You will also have three plastic bags, two containing small snaps for use in stacking the cases, and one containing the tabbed drawer dividers.
- Identify the bag containing the drawer dividers -- it also contains the two metal keys for the front drawer lock.
- Start by laying one of the large flat top/bottom pieces down in front of you, with the smooth surface down and the ribbed slots facing up.
- Insert the side pieces into the bottom, with their sliding rails facing toward the inside of the cabinet, matching the tabs on their bottoms with the slots in the bottom piece.
- Slide the back piece into the bottom, guiding the small matching tab-and-groves at the top into place with the matching groves at the top-back of each side. Gently press all sides and back down into the bottom so that the fit is snug.
- Press the large top piece down onto the tabs on the side and back pieces, carefully aligning the tabs and gently press the top down until it is snug.
- Lay the front drawer cover down in front of you with the black surface down and the thinest edge toward you and the lock to the right side.
- Place the drawer piece down onto the front drawer cover so that its bottom is furthest from you and the inside of the drawer points toward you.
- As you look at the drawer piece, it will have two slots along the bottom (front) side of the drawer, matching the two tabs that extend up from the front cover piece.
- Slide the right slot over the tab on the front cover piece, and slide the drawer gently to the left over the tab so that the slot on the left will be over the other tab that sticks up near the left side of the front cover.
- Once the left slot is directly over the left tab, firmly press on the drawer around the left slot until it snaps down over the tab, locking the front onto the drawer.
- Pull the rails out of the cabinet, so they are exposed to view.
- Pick up the assembled drawer and insert it into the rails along each side, guiding the extentions along each side of the drawer into the matching slots in each rail until the drawer is snugly assembled into the rails.
- Make sure all pieces are snugly fit together and test the operation of the drawer by pushing it into the cabinet and sliding it back out several times.
- Try locking the cabinet with one of the keys from the bag with the dividers.
- Make any needed adjustments to the alignments of the pieces so that the unit is snuggly fit and the lock works.
- Your cabinet should be ready for arranging the drawer dividers and then its ready to use!
- Insert the long center divider piece into the drawer, running front to back.
- Insert as many dividers into the bottom slots in the drawer as you wish to use. Dividers can be added or removed or moved as desired.
- If you have more than one cabinet, you may want to use the included tabs and snaps to attach the cabinets together, so they won't slide around on your work desk.
- Enjoy your cabinet!
|